Search Knowledge Base by Keyword
Getting Started
This article will cover server setup, server access controls, license transfers, and client configuration for a Verity Network License.
Network licenses fully support RDP and virtual machines. This has been tested using VMware and Hyper-V.
Server Setup
To install only the software license on a server, download this zip file, which contains the necessary tools: VerityNetworkSetup.zip
If you are not able to download this for any reason, please contact support at support@clearedge3d.com.
On the licensing server, unzip the VerityNetworkSetup.zip found above. It contains the following 3 files:
- Haspdinst_Runner.bat
- haspdinst.exe
- RUS-LicenseTool.exe
Summary of Steps to install and activate:
- Run the Haspdinst_Runner.bat as an admin
- Create a .c2v request file using the RUS-LicenseTool.exe (use your company name as the name of the file to keep things organized)
- Email the .c2v file to licensing@clearedge3d.com
- Apply the .v2c file sent in response using the RUS-LicenseTool.exe
License Environment Setup
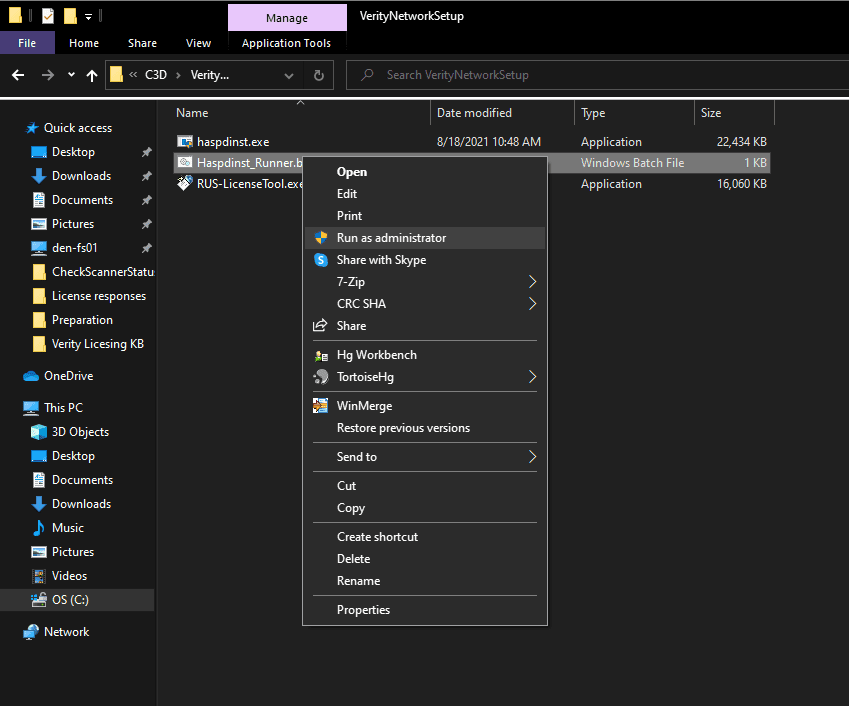
Run the Haspdinst_Runner.bat as an admin:
After successful installation, confirm the licensing environment installation locally on the server here: Sentinel Admin Control Center.
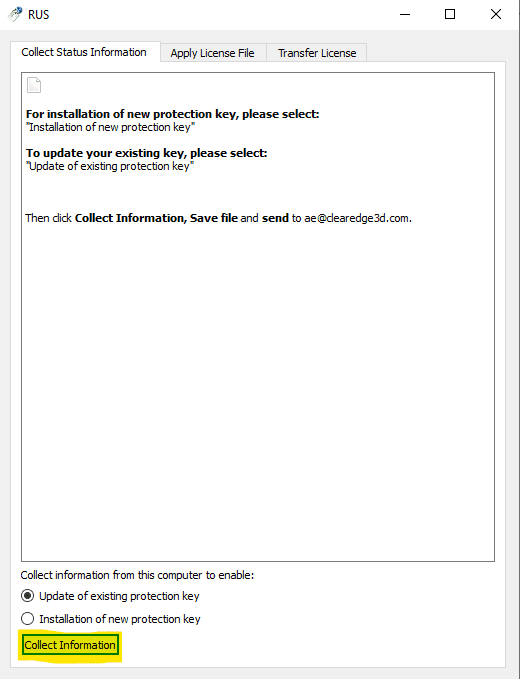
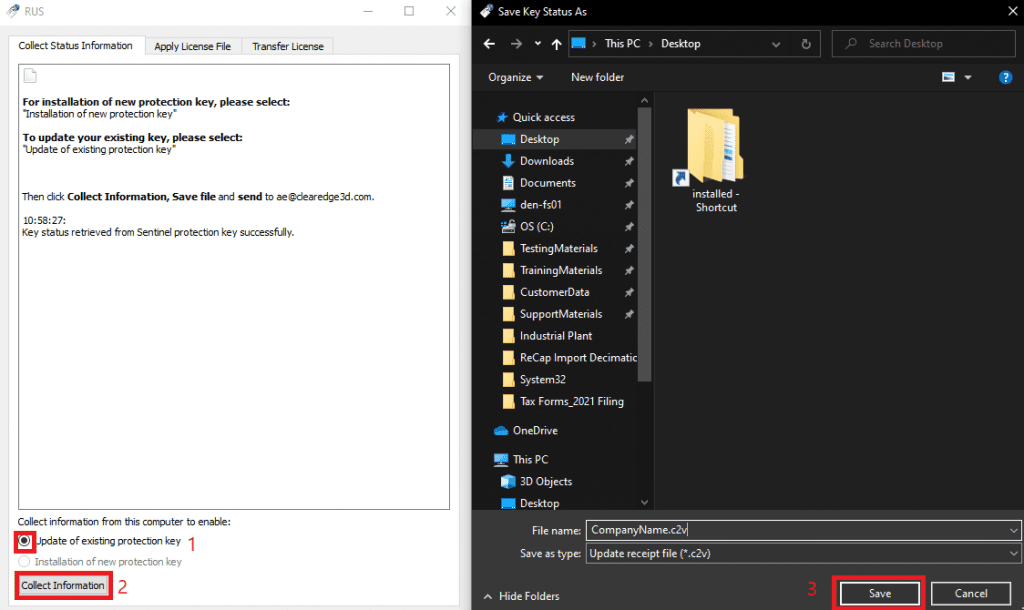
Once this is accessible, open the Verity RUS-LicenseTool. Select the Installation of new protection key under “Collect Status Information”. Select Collect Information to create the c2v file:
Email the .c2v file to licensing@clearedge3d.com. It is recommended to respond directly to the ClearEdge3D License Certificate email. A corresponding .v2c file will be sent back to you.
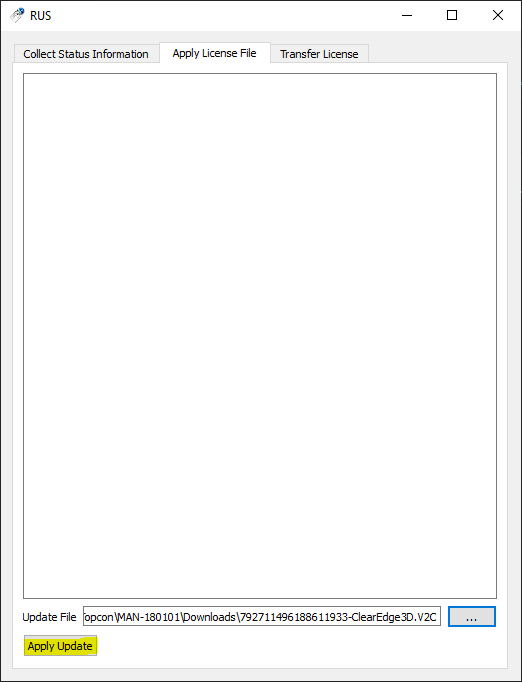
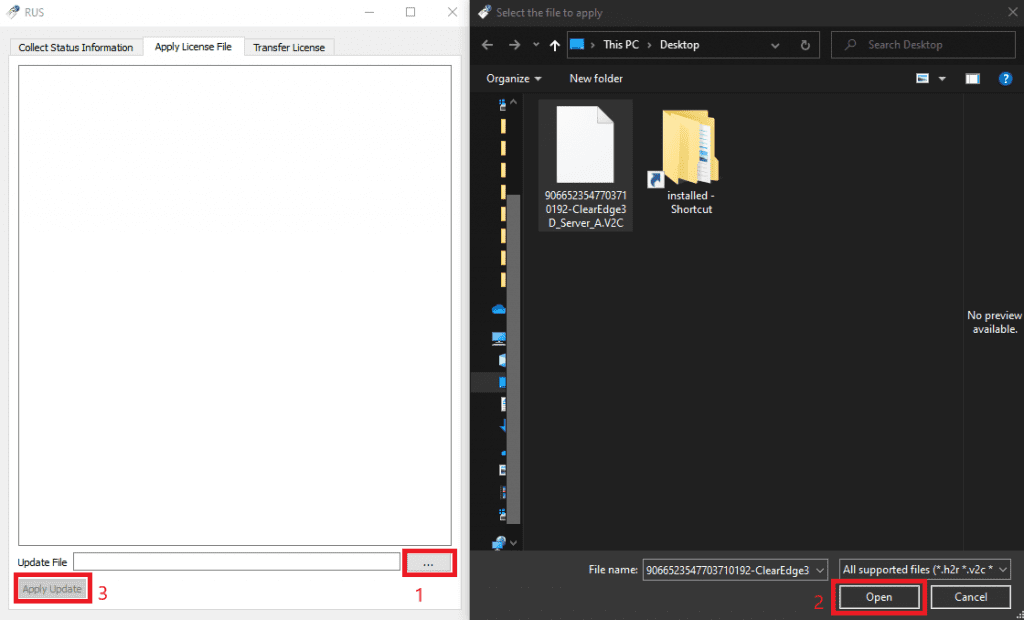
On the same computer, open the RUS-EWLicenseTool.exe and navigate to the Apply License File section. Select the provided v2c file and click Apply Update:
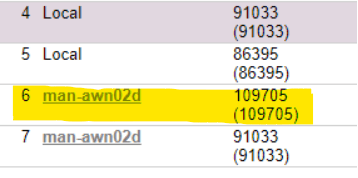
Verify that the license is active by navigating to Sentinel Admin Control Center. Verity keys have the Vendor ID 109705.

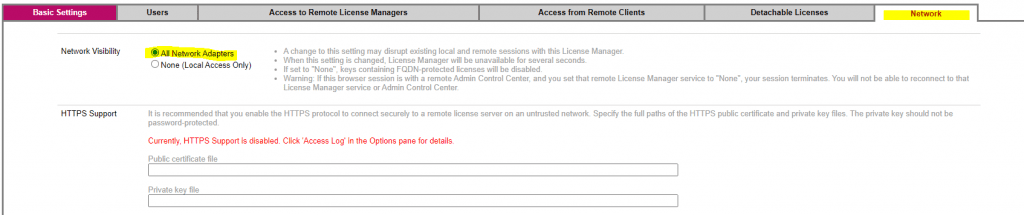
After activating the license, the license needs to be made accessible on the network. Start by navigating the Sentinel Admin Control Center: Network Configuration. Set the Network Visibility to All Network Adapters:
License Transfers
The licensing system is currently not setup to perform transfers purely on the client side. To conduct a license transfer the following steps need to be conducted.
For the transfer to work, both servers need to have this zip folder downloaded: VerityNetworkSetup.zip. Additionally, they must have the HASP runner ran and installed (included in the zip folder). For “Server A” this should already be done because it has an existing license. For “Server B” this is essentially following the steps provided in the Server Setup section above. (These steps in the example below are assuming a license transfer from Server A to Server B)
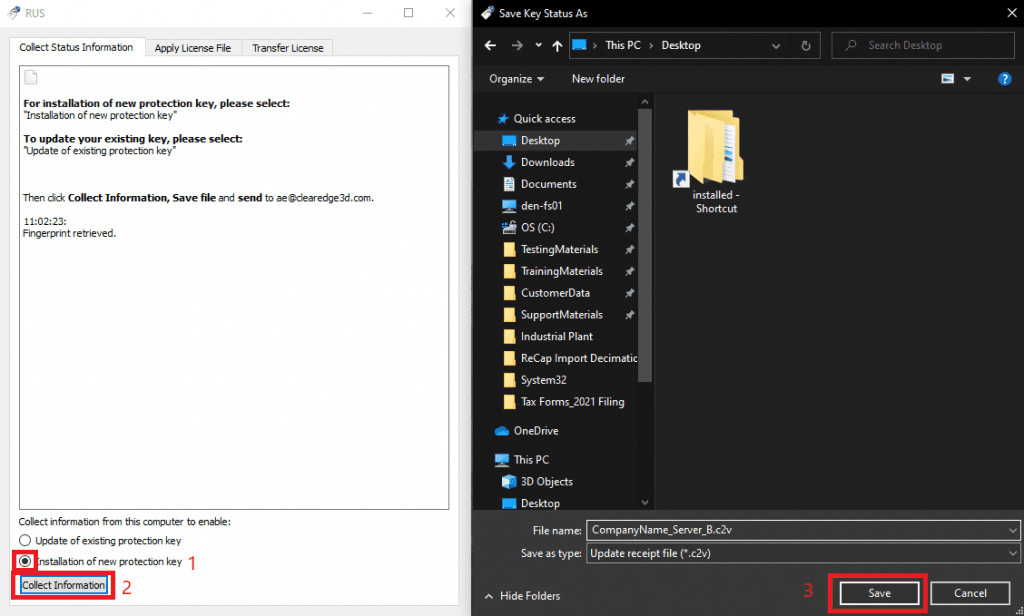
Step 1: Produce a c2v file using the RUS-LicenseTool.exe on Server A. Choose the Update of existing protection key option within the Collect Status Information tab.
- Send this file to licensing@clearedge3d.com and request a license transfer in the body of the email along with your company name.
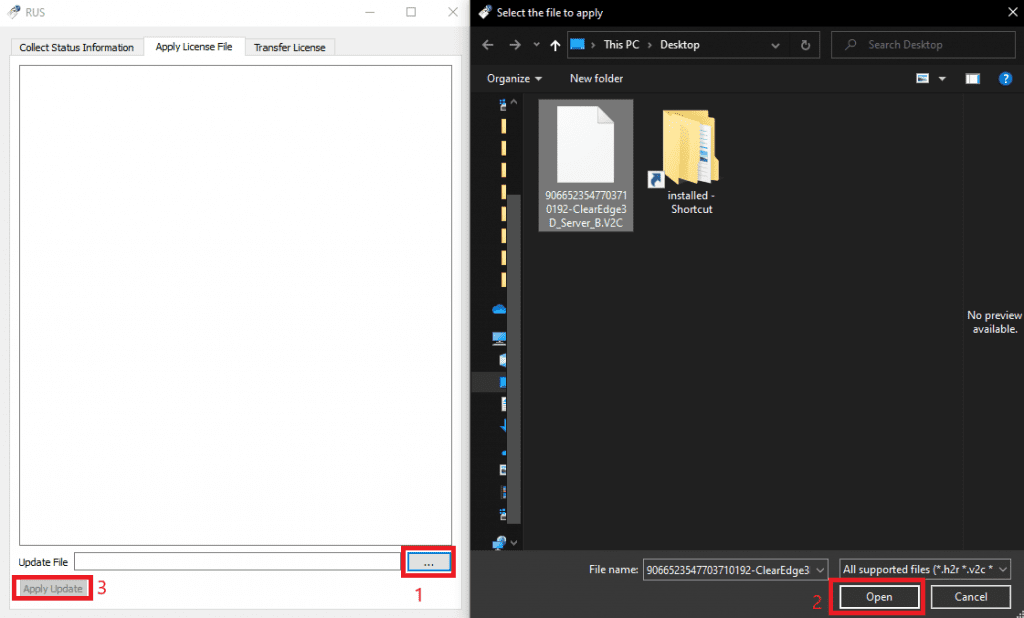
Step 2: Apply the formatted v2c file sent in response within the RUS-LicenseTool.exe on Server A. Select the … button at the bottom of the Apply License File tab, browse for the v2c file, select it, click open, then click the Apply Update button.
Step 3: Repeat Step 1
- Send this file to licensing@clearedge3d.com
- These first 3 steps above format your existing license to deactivate it. By collecting a second c2v file, we are able to confirm the format has fully taken place. Once these steps are complete, we can proceed to the following steps that involve Server B.
Step 4: Produce a c2v file using the RUS-LicenseTool.exe on Server B. Choose the Installation of new protection key option within the Collect Status Information tab.
- Send this file to licensing@clearedge3d.com
- This step has you create a blank c2v file for us to apply the new license information to for your Server B
Step 5: Apply the v2c file sent in response within the RUS-LicenseTool.exe on Server B (select the … button at the bottom of the Apply License File tab, browse for the v2c file, select it, click open, then click the Apply Update button).
At this point you should be up and running.
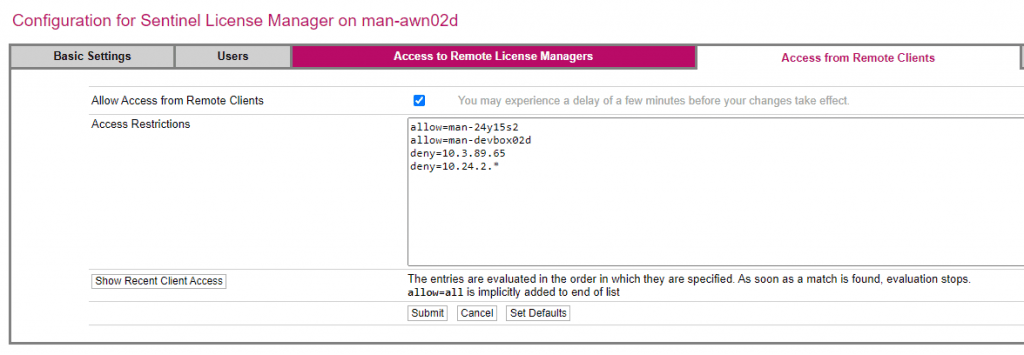
Server Access Controls
License access can be controlled in the Access from Remote Clients section of the Sentinel Admin Control Center: Client Configuration. By default, any computer on the network can access the license.
Ensure the Allow Access from Remote Clients is checked. There are a large variety of options for controlling access. This is a guide hosted by the local licensing environment: http://localhost:1947/_int_/ACC_help_config_remote_clients.html
From the link above
allow=[item] and/or deny=[item], where item is an IP address or machine name. IP addresses can include “*” or a range of addresses to allow or deny multiple addresses. The value of item can also be all or none. Each entry must be on a separate line. The entries are evaluated in the order in which they are specified.
For example, item can be:
10.24.2.18 a single address10.24.2.10-50 range of addresses (only 4th number may be a range)10.24.2.* class C subnet10.24.*.* class B subnet10.*.*.* class A subnet10.24.2.0/24 subnet, number of mask bits specified
Client Configuration
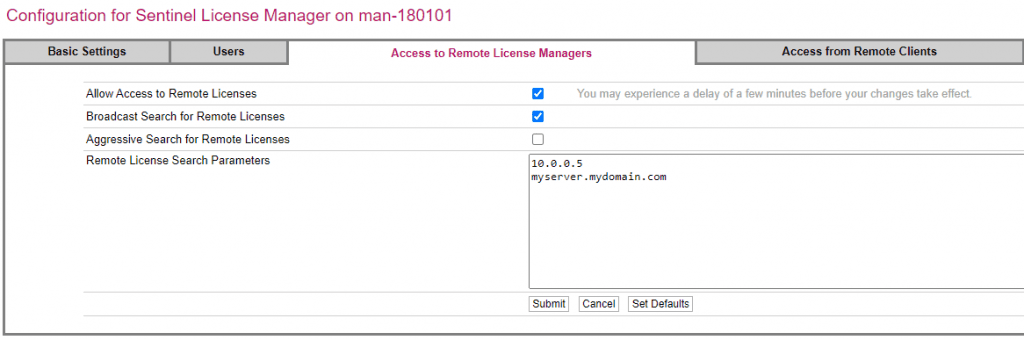
Once the license is activated on the server, client computers should be configured to find the network license.
This is done on the client computer running Verity in the configuration section of the Sentinel Admin Control Center: Configuration.
Start by going to the Access to Remote License Managers section and place the IP or FQDN of the server that was just setup in the Remote License Search Parameters section.
Also, check the Allow Access to Remote Licenses check box:
After configuration, wait up to a minute for the local client service to find newly defined licenses. They will appear in the http://localhost:1947/_int_/devices.html section with the location being the name of the license server.
Once these are seen in the localhost, open Verity to confirm the licenses are found.