Search Knowledge Base by Keyword
Getting Started
This article will cover the General Options found within Rithm and basic navigation. These general options will include the Rithm menu, and the options found in the left hand menu, while navigation will include how to move around within your Rithm point cloud among other options.
Navigation
Rithm is a companion plugin to Navisworks. Because of this, navigation within the 3D view in Rithm is the same as with Navisworks. This includes actions such as orbit, zoom, pan, and so on.
Left-Hand Panel Options
The Left Hand Side Panel includes a variety of visualization tools, QA tools, and some other actions.
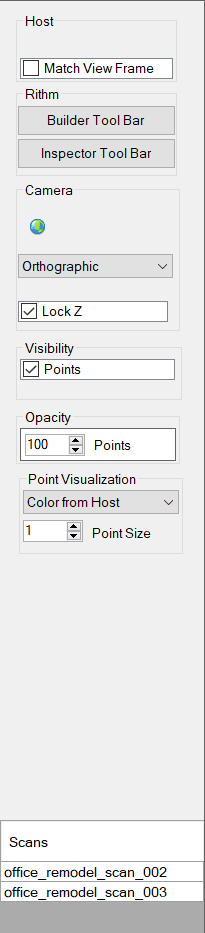
Checking the Match View Frame box will link the camera views between Rithm and Navisworks. This means if you pan, orbit, zoom, or any other action in Navisworks, the same motion will happen automatically in Rithm. If you move the camera in Rithm, then the same motion will happen automatically in Navisworks.
Clicking the Builder Toolbar or Inspector Toolbar menus will open the respective toolbar. For more information on these options, start at the Builder Toolbar Overview or Inspector Toolbar Overview articles.
The globe icon is the Align to Project function. Pressing this button will align the 3D views to world coordinates.
The drop down menu below the globe icon allows you to change between Orthographic and Perspective view.
Checking the Lock Z axis checkbox will lock the Z axis so that it is always point upwards when navigating in the 3D view. This prevents the Z axis from slipping when navigating around your point cloud.
The Points checkbox will hide or show your point cloud within Rithm. This may be useful when isolating results from Rithm.
The Points Opacity text field allows you to adjust the opacity of your pointcloud within Rithm.
The Point Visualization drop down menu allows you to change the coloring of the points between Color From Host and Single Point Color. Color From Host will keep the original coloring from your project. Single Point Color will adjust your points in your cloud to only use one color.
The Point Size text field allows you to adjust how large each individual point in your pointcloud is.
Underneath the Scans sub-menu you will find all current scans in your Rithm project.
Ribbon
If you click the Rithm menu in the ribbon you’ll be given some options.
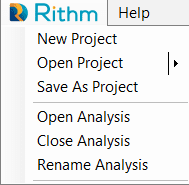
The New Project, Open Project, and Save As Project, allow you to create a new project, open a pre-existing project, and save as the current project respectively.
Open Analysis, Close Analysis, and Rename Analysis allow you to open a different analysis, close the current analysis, and rename the current analysis respectively.
Help Menu
The Help Menu provides a variety of additional support and your current version of Rithm information.
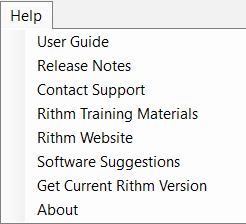
Pressing the User Guide option will open the locally downloaded Rithm user documentation.
If you click Release Notes, Rithm will open the most recent downloaded release notes document.
Contact Support will open your default email program with a draft email ready to be sent to support.
Rithm Training Materials will open a browser tab to a gallery of training videos for ClearEdge3D software. Currently there are no Rithm training videos but they are in progress.
Rithm Website will open a browser tab to the main Rithm section of the ClearEdge3D website.
Software Suggestions will open your default email program with a draft email ready to be sent to support.
If you click Get Current Rithm Version a browser tab will open to our Software Updates page on the ClearEdge3D website.
If you click About an small menu will open that gives you info about your Rithm license.