Search Knowledge Base by Keyword
Getting Started
This article will cover the Wet Concrete tool found in the Surfaces menu in the Builder Toolbar. The Wet Concrete tool is a combination of the Debris Filter and Heat map tools.
Wet Concrete
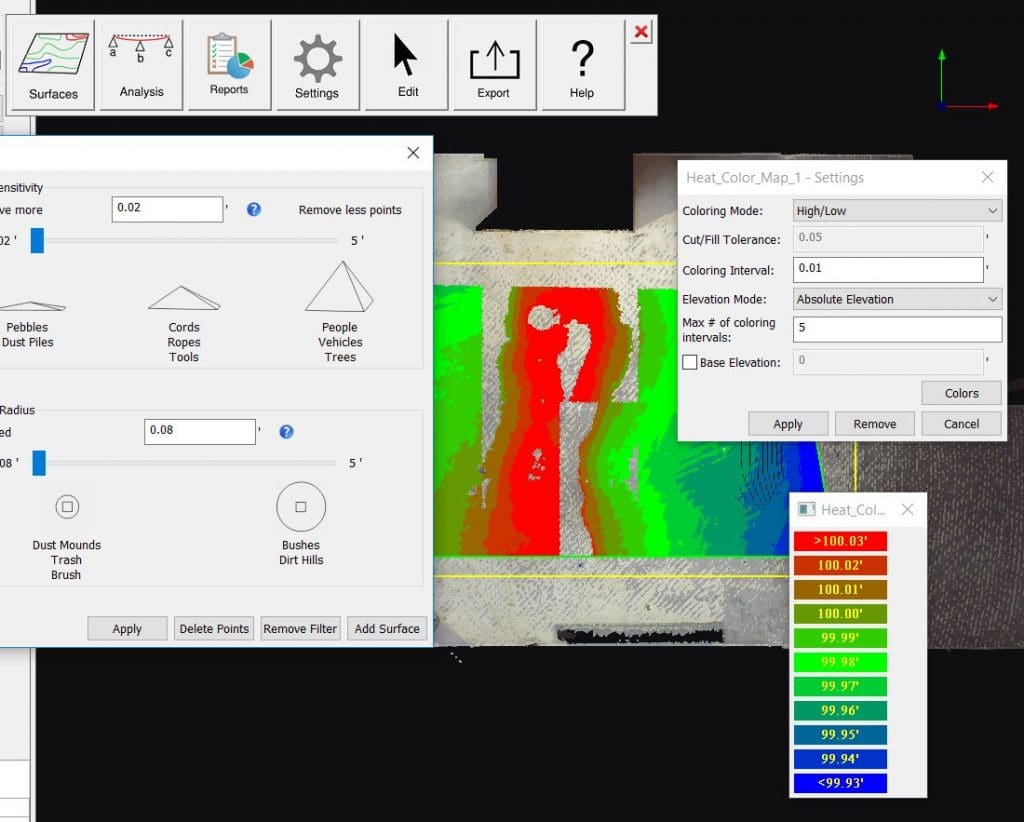
To use this tool first open the builder tool bar, then select Surfaces. Next, define the analyze area by left clicking points around the point cloud. You do not need to connect your dots. Once you press enter, Rithm will close the connection.
Wet Concrete Settings
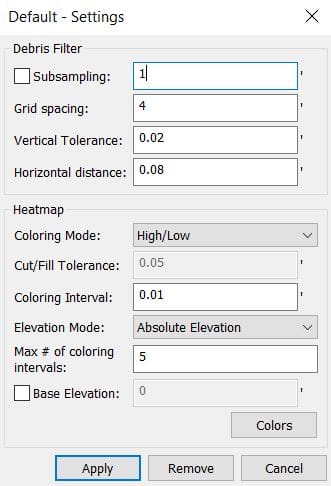
Subsampling – Reduces the density of the point cloud to a specific grid spacing. This will cause a pseudo-point cloud decimation but will still ensure accuracy as good as if the point cloud had not gone through subsampling. We recommend a 1 inch decimation for most projects.
Grid spacing – Determines the outlier search area. Larger grid spacing is better for flatter/indoor floors (or freshly poured concrete). A lower grid spacing usually applies to outdoor floors, or floors with more deviation.
Vertical Tolerance – On each grid section the average z is calculated and anything that is above the average plus the “Vertical Tolerance”, or below the average minus the “Vertical Tolerance”, is filtered out.
Note that “Vertical Tolerance” controls how large each section of the grid will be. Tighter grids will give better results if the average height of the surface is changing more drastically.
Horizontal distance – Eliminates additional points from the point cloud. All points that are closer than cleanup radius to the points identified by height sensitivity will also be marked as debris
Coloring Mode – Determines if the coloring is based on High/Low elevation intervals or Cut/Fill amounts.
Cut/Fill Tolerance – The elevation above and below the base elevation that determines if the point should be cut or filled if the Coloring Mode is Cut/Fill.
Coloring Interval – The elevation interval between the colored bands if the Coloring Mode is High/Low.
Elevation Mode – Determines how to show the elevations values; either as Absolute Elevations, or Relative Elevations from the Base Elevation.
Max # of coloring intervals – Determines the number of color intervals used to color the point color if the Coloring Mode is High/Low.
Base Elevation – If you check this option, the value specifies the base elevation from which the High/Low or Cut/Fill areas are measured. If you uncheck this option, the base elevation is halfway between the highest and lowest elevation in the selected area.
Wet Concrete Completion
Once you have your desire settings, click apply. The debris filter dialog and heat map settings dialog will open, and you analysis will display over your point cloud. You can close out the debris filter dialog and heatmap settings dialog. You can access these dialogues again through the layer selection drop down menu found in the Builder Toolbar Edit button.
Export
Use the export feature in the builder tab to export the map as a .xyz file. Open the file in Recap and save it as an RCP file. Next, append it into your Navisworks project.