Search Knowledge Base by Keyword
Getting Started
The building module inside of EdgeWise offers a fully automated algorithm that performs automatic wall extraction. This article will cover how to import your EdgeWise wall model into Revit using the Revit Importer.
Ensure you export a .c3rvt file from EdgeWise before proceeding with this step. Once you have your .c3rvt file from EdgeWise, we can proceed to use the Revit Importer.
First, open a new or existing project in Revit, then navigate to the EdgeWise Import tab in the ribbon.
Click Open Model, locate your .c3rvt file for your walls, and click Open. This will open the Building Import Options dialogue box.
Revit Importer Options
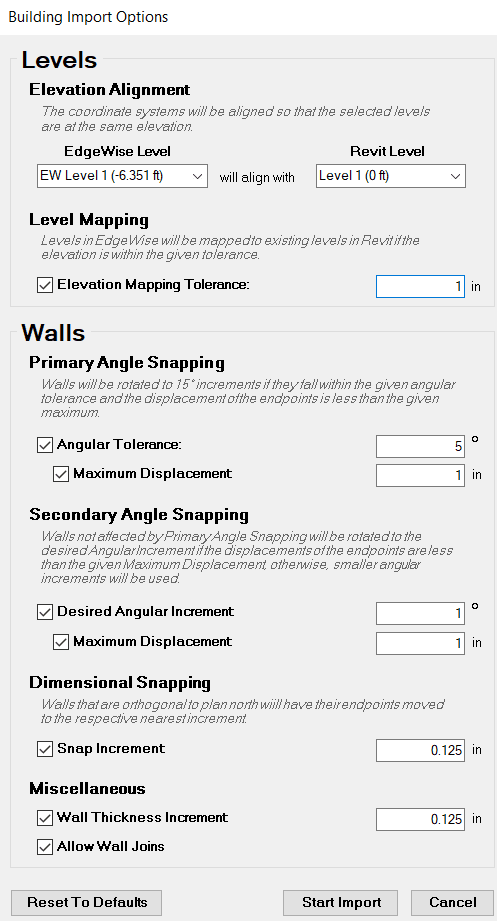
In this dialogue box, you have the control to determine how as-designed vs as-built you want your model.
- Elevation Alignment allows you to Assign an EdgeWise Level with a Revit Level for the starting point of your project.
- Level Mapping will map Levels in EdgeWise to existing levels in Revit. This will occur if the elevation of a EdgeWise level is within the given tolerance of a Revit level
- Primary Angle Snapping will rotate walls to 15 degree increments if they fall within the given angular tolerance. The displacement of the endpoints must also be less than the given maximum for this to occur.
- Secondary Angle Snapping will rotate walls not affected by Primary Angle Snapping to the desired Angular Increment. The displacements of the endpoints must also be less than the given Maximum Displacement. If they aren’t, smaller angular increments are used.
- Dimensional Snapping will snap endpoints of walls to the nearest respective increment if the walls are orthogonal to plan north.
- Wall Thickness Increment will snap wall thickness to the nearest respective increment.
- Allow Wall Joins will attempt to join walls that overlap.
Of course, you have the option to turn off any combination of these settings if you wish. Click Start Import once you have selected your desired settings.
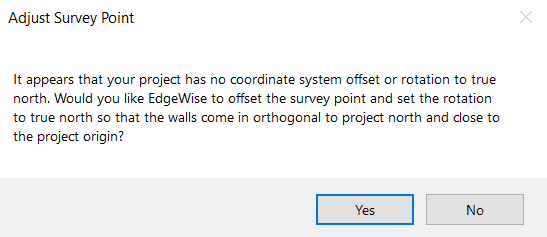
Orthogonal Rotation
At this point, you can choose to let EdgeWise offset the survey point and set the rotation to true north. This will ensure walls come in orthogonal to project north and close to the project origin. Click Yes, or you can click No if you’d prefer EdgeWise not make these adjustments. This dialogue box will not appear if your project already has a coordinate system offset or rotation to true north.
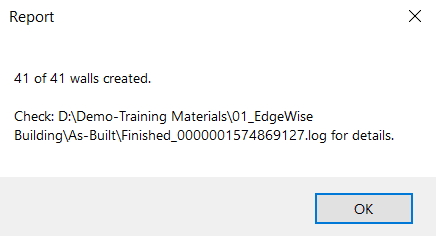
Once EdgeWise has completed your import, you will be given a Report that shows how many walls were successfully built as well as where to locate your import’s log file.
This may be the last step in the workflow if you wish to only use Revit tools from here. However, there are still a few tools in the EdgeWise plugin toolbar that are covered here.