Search Knowledge Base by Keyword
-
Licensing
-
General
-
Process Scans
-
Piping
-
Structure
-
Ducting
-
Cable Trays
-
- Articles coming soon
-
- Articles coming soon
-
Building
-
Exports
-
Point Clouds
2 out of 5 stars
6 ratings
| 5 Stars | 33% | |
| 4 Stars | 0% | |
| 3 Stars | 0% | |
| 2 Stars | 0% | |
| 1 Stars | 67% |
Getting Started
This article will cover how to export your EdgeWise models to Revit. EdgeWise has a dedicated import plugin that is automatically installed upon installing EdgeWise. This allows your export to Revit become native Revit family objects.
How to Export to Revit
With any model open in EdgeWise, navigate to the File tab. On the far right-hand side you will see a Export to Revit button.
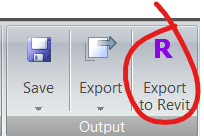
Upon clicking this button, a File Explorer window will open. Here, you can name your .c3rvt file. This file type is proprietary to EdgeWise and allows the file to communicate with the Revit API. After naming your file, click Save. Now your file is ready for import into Revit.
How to Import in Revit
Now that you have your .c3rvt file is ready, open Revit. Once open, navigate to the EdgeWise Import tab. On the far left-hand side of this tab click the Open Model button.

After clicking this button, a File Explorer window will appear. Navigate to your .c3rvt file, select it, and click Open. From here, the importer will proceed with its next steps depending on the model you are importing.
Click Piping for more information regarding Piping Exports. Click Structure or Ducting, for their respective Export information. Lastly, click Building for related Export information and Revit Importer for building-specific Revit Import information.
2 out of 5 stars
6 ratings
| 5 Stars | 33% | |
| 4 Stars | 0% | |
| 3 Stars | 0% | |
| 2 Stars | 0% | |
| 1 Stars | 67% |